User Profile Pages/My Preferences and Profile:
A User Profile Page displays information for sharing with other Orphalese Registered Users. The information can include a photograph, a nickname, a biography, and a website link.
To open the User Profile Pages and/or My Preferences and Profile Window:
- From the Orphalese Desktop, right-click on the Deck to display the Orphalese Menu.
- Click Orphalese Tarot Community.
- Click User Profile Pages or My Preferences and Profile.
The User Profile Pages window opens.
 Community User Profile
Note: The User Profile Pages and My Preferences and Profile features have been combined into the one window as two separate tabs. Whichever option you select in Step 3 will be the tab that opens in the window, but you can access the other option from the same window by clicking on the other tab. Both options remain on the menu to ensure compatibility with earlier software versions.
Profile Sort Order:
By default, Profiles are listed in descending Nickname order with the most recently created or edited profile appearing at the top.
Sort Profiles: alphabetically by Nickname; by those with a website link; by those with a biography; and/or by those with an image. An arrow on the column's heading denotes which column will be used for the sort, and whether the list will be ascending or descending. The first click on a column sorts the order in an ascending direction.
Note: When sorted by the website/biography/image columns, an ascending order will group all of the Users without that information at the top. Within that group, Profiles will still be sorted with the most recently created or edited profile appearing at the top.
To change the Profile Sort Order:
- Click once on any column's heading to change the sort order and direction. Clicking again on the same column heading will reverse the sort direction.
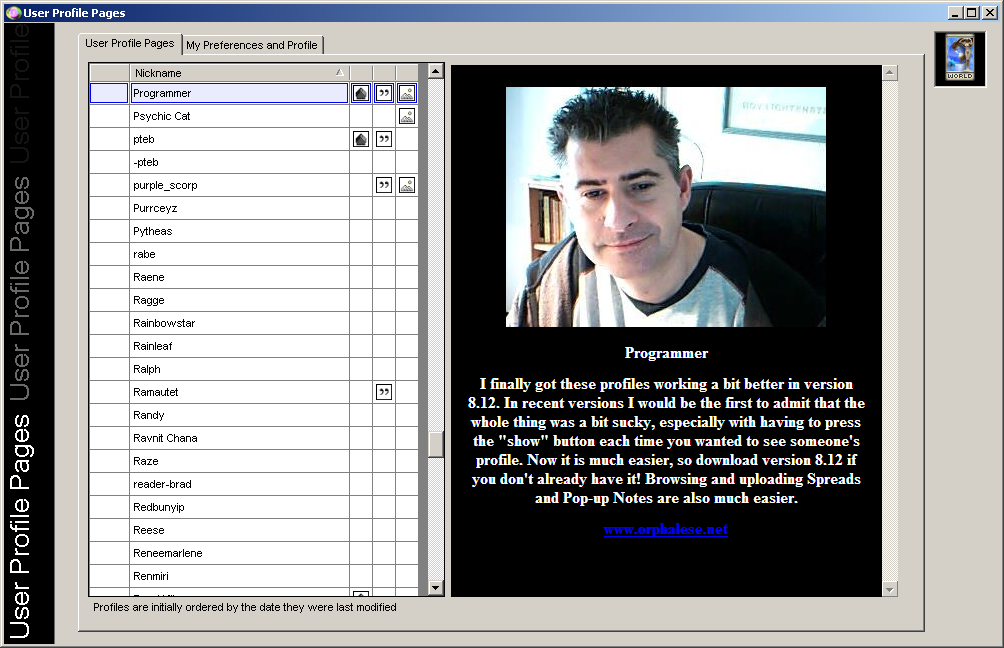
To view a Profile Page:
- From the My Preferences and Profile tab, click on a Nickname to display the information that the User has chosen to share. Their Profile will be loaded in the right-hand frame of the window with their photo at the top, the biography in the middle, and website address at the bottom. You may need to scroll to see all of the information.
Notes:
- A Nickname will only be visible if the User has entered a Nickname and chosen Show my profile to other users in their Profile.
- Icons denote the information that the User has chosen to share: the Home icon shows they have included their website address; the Quotation icon shows they have included a Biography; and the Image icon shows they have included a photo or image.
To create a Profile:
 Community User Preferences
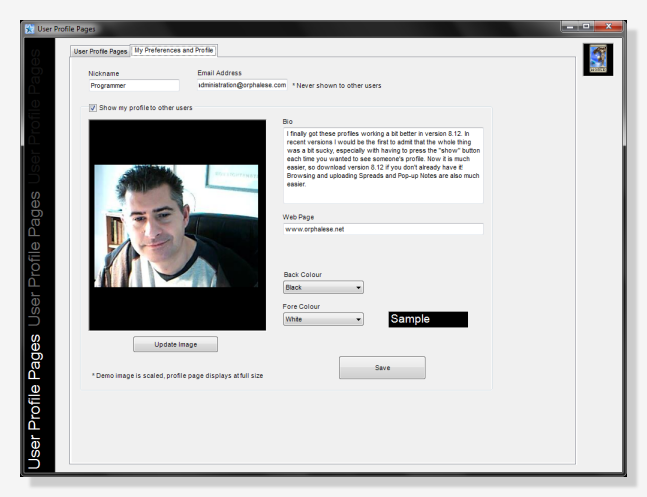
- From the My Preferences and Profile tab, enter the information that you would like to share with the other Registered Users.
Note: Choose as many or as few of the following fields to complete:
- Nickname - this name will appear in the User Profile Pages and identifies you to the other Registered Users.
- Email Address - the email address is for the system administrator/programmer only and is never shared. It is used by the system for identification verification when you have lost the unlock code or to email you important updates (if you have opted to receive them).
- Email me about important updates - place a tick in this box if you wish to receive email notifications about server and program-related matters. This box is unchecked by default.
- Show my profile to other users - place a tick in this box if you are happy to share the information (and be included in the User Profile Pages). This box is unchecked by default.
- Bio - write a description about yourself, your interests, your goals and dreams or whatever you feel you would like to share with the Registered Users.
- Webpage - enter your website address.
- Back and Fore Colours - select colours from the drop-down list for your profile's background. A sample is displayed.
- Update Image - Click on this button to open a window to select and upload an image or photo of yourself or of something that represents you.
- When you have completed the information, click the Save button.